Wednesday, June 24, 2009
Setting the Domain co.cc

As we know, that co.cc is a top-level domain, which you can get for free. We can change the name of our blog from "http://namadomain.blogspot.com" or "http" / / namadomain.wordpress.com "(etc.) to" http://namadomain.co.cc. "With co.cc we can control the DNS Records, A, MX, and CNAME records, so co.cc domain is not just a "URL Forwarding".
Here I will try to reveal about how the co.cc domain settings:
There are 3 types of settings in co.cc. They have a distinctive function. the following explanation:
1. Managed DNS
This is usually used for a web hosting and web require the Server Name to direct them to the hosting. Eg to create a web in 000webhost, or can also do to use the wordpress blog hosting from the outside. This method is not suitable for blogger / blogspot hosting the use of the default blogger / blogspot.
Setting for this method is to fill in the "Name Server 1 and Name Server 2 with the name server in accordance with the hosting I used. For example, for the use of hosting 000webhost for the column" Name Server 1 "filled with" ns01.000webhost . com "and the" Name Server 2 "filled with" ns02.000webhost.com. "Then click the" Setup ". Done

2. Zone Records
Zone records suitable for users blogger / blogspot. following settings for how Zone Records
* In the "Host" fill in the domain name you have registered you, eg "www.namadomain.co.cc"
(do not forget to be "www")
* For option "TTL" let alone, I need to change
* The option "Type" select the "CNAME"
* For the "Value" fill "ghs.google.com"
So it will be like in the picture below:

The next step, namely the settingan in blogger / blogspot is here:
* Login to blogger / blogspot then go to menu "Settings -> Publishing"
* Then select "Switch to: • Custom Domain
* Then click on "Already own a domain? Switch to advanced settings"
* Then fill in the domain name you a new column in the "Your Domain".

* Then click the "Save Settings"
Done. If successful (settings are correct) then the new domain you will be active in the time between several hours to 2 days. Be patient, just waiting. Blog you will still be accessible through the domain with the old.
3. URL Forwarding
URL forwarding can be used for What is, what can a web blog. But this is only the URL Forwarding memforward new domain (in which co.cc) to the old domain. Domain so long as they are 100% without any changes, we can only access the web / blog by typing the name of our new domain in our browser. If you use the URL Forwarding is one index in the Search engine Google or the other we are still the old Domain.
For setting the URL Forwarding is easy, we only fill in the data requested and tailored to the web / blog for you, such as "Redirect to: Page Title, URL Hiding, Meta Description and Meta Keywords." We do not need to setting up the domain in the web / blog us again.
Note: This method is not recommended if not necessary
So conclusion is:
* If you use a service blogger / blogspot then use "Zone Records"
* If the domain is used for web hosting or you need to do then use "Manage DNS"
* Do not use the "URL forwarding" if not forced. For example to multiply's blog that does not
support custom domains.
Read More....!!!
Sunday, June 21, 2009
Install XP using the Flash Disk

What you need?
In order for installation through the USB flash is successful, the following is what need to belong (provided):
* A USB flash with a minimum capacity of 1 GB so that is enough to accommodate the Windows XP CD that size around 700 MB.
* The program named usb_prep8 and bootsect.
* Master Windows XP
* Bios in Computer / Laptop must support Booting via USB

How to make:
* Extract USB_Prep8 Program and BootSect
* Extract files usb_prep8 and bootsect.
* Move to folder usb_prep8. Make a double click of the usb_prep8.cmd. Command prompt (DOS prompt, text-based) will open.
Format Flash Disk
* Press a button on the keyboard to continue. PeToUSB window (graphics) will be open.
* Do not do any of the PeToUSB window, simply click "Start". The process to format USB flash disk immediately.
Create Bootable Flashdisk
* DO NOT CLOSE the window (PetoUSB and usb_prep8) is.
* Now, open a new command prompt by typing "cmd" in the field in Start => Run.
* In this new Command prompt, please move to the directory where the files are bootsect.exe (use the command cd nama_direktori_tujuan. Example: cd d: \ usb_prep8 \ bootsect \).
* Type "bootsect.exe / nt52 F:". Change "F" with the drive letter of your USB flash disk.
* If run properly, the message will be "Bootcode was successfully updated on all Targeted volumes." Please close this command prompt
* Remember! (But Do not close the Command prompt usb_prep8).
Master copy of Windows XP to Flash Disk
1. Close window PeToUSB (graphic). Program akan usb_prep8 display a list of what you need to specify later.
2. Now you need to enter the appropriate information for the number 1-3.
3. Press 1 (on the keyboard) and then enter.
4. Folder browse window will open to the location where the Windows XP setup files are (ie CD ROM drive).
5. Press 2 and enter a letter that is not used as the name of the drive in the PC is chache. For example: T. Q Drive later this is just temporary. To save chache files from Windows XP.
6. Press 3 and enter the drive letter where the USB flash disk is located.
7. Press 4 to start the process of copying the master of Windows XP to flash disk.
8. The script will ask whether to agree to format drive T:. This is only temporary drive yag made a program for men-cache the installation files of Windows XP. Press Y and Enter. If the question out again and press ENTER
9. After formatting, press Enter to resume, the program to copy files from the Windows XP CD into the drive Q is temporary. If finished, press Enter.
10. Next pop up box appears asking approval to copy files from the temporary drive to the USB drive. Click Yes. This is quite long, about 15 to 30 minutes.
11. Then pop-up window appears to make the USB drive U: which contains the Master as a Windows boot drive. Select Yes.
12. Select Yes to unmount virtual drives.
13. Making Bootable USB Flashdisk through already finished Read More....!!!
Thursday, June 19, 2008
Make antenna Wajanbolic

Antenna WAJANBOLIC Why WajanBolic called?
* Frying pan: frying pan, kitchen tools make cooking
* Bolic: parabolic
* WajanBolic: parabolic antenna made from the frying pan
Because it comes from the frying pan is not comparable to its perfection dg parabolic antenna factual. In the workshop will be made with WajanBolic N Antenna Connector and Pigtail with:
Some of the lack of antenna WajanBolic:
Because the solid form of the influence of wind dish large enough so that it requires mounting to a tower strong enough
Antenna 2.4 GHz
Some Examples 2.4 GHz Antenna Design
Most homebrew wifi antenna you have on the internet: yagi antenna, antenna cans (tincan antenna), antenna biquad, Helix antenna, slotted waveguide antenna. I always have the components in the antenna-design antenna page: N-type Connector & pigtail
Connector: N-type Male, Female N-type, RP TNC Male, RP TNC Female, Pigtail
Ok ..! we go to the making of WajanBolic
Preparation
Equipment and materials that need to be prepared in: MATERIAL
1. Pan diameter 36 "(diametr the bigger the better)
2. PVC paralon thin diameter 3 "1 meter
3. Doff 3 "(closed paralon PVC) 2 pieces
4. Aluminum foil
5. Baut + mur size 12 or 14
6. And female Connector
7. copper wire No.3
8. Double tape lakban +
EQUIPMENT
1. Ruler
2. Knife / Cutter
3. + Tin solder is
4. Hacksaw
Estimated RATES
Estimated cost incurred to purchase the materials WajanBolic is less than Rp 100.000, -. Compare jikan you have to buy Grid 24db antenna, the only local product to Rp 500,000, - more and import could reach Rp 1.000.000, - more. Antenna or purchase price of the local grid is Rp 200,000, - while the import could reach Rp 300,000 more.
Development
1. Prepare all materials and equipment needed.
2. Hole right in the middle of the griddle pan is sized bolts 12 or 14, just one hole only.
Then, measure diametr frying pan, frying pan depth feeder and / focus point. For more details please his tough image below.
Example:
Focus on the point end of the page feeder is installed. To get the maximum gain. 


How to Change Blogspot Template

- Change your Blogspot Template
- How to Change Blogspot Template
This will tell you how to change the template on blogspot blog into your default template selection preferences. Of course, you first need to download the first template-specific templates for bloggers who are so many available on the Internet.
Please search Google with keyword: "download free blogger templates", select the most you like and will usually be explained a little how to set-up on your blogspot. General template can be used directly, but not all templates can be used directly. If the template can not be used this is usually due to the version of your template is the classic version, please do upgrade or find a template that specifies that the template you can use on the latest version of blogger.
Changing Step Template
Make sure you have a file template for blogspot that with the extension. XML. XML is the language family of HTML and XHTML and is a standard language that can be translated by the browser, the Internet becomes the order form so that a layout or design of this website / blog.
Please Login using your account blogger / Google, and select one of your blog (sorry, this tutorial uses the English language settings, if you use the language and location of Indonesia and its position is the same).
Step 1:
Select the Layout - Edit HTML

Step 2:
Click the Browse button, locate the file storage location. Xml you. In this example I use Blogger template Gray Press (grey_press_blogger.xml)

Step 3:
Click the Upload button, make sure there is no error, as shown in the image below

Step 4:
Click the SAVE TEMPLATE
 Read More....!!!
Sunday, June 15, 2008
Learn To Install XAMPP Joomla

Next is the need to prepare you:
- Computer, can be a PC or Laptop
- XAMPP 1.5.3a. XAMPP is a package that contains the program of Apache, MySQL, filezilla, and Mercury. Here is the required Service Apachenya only.
- CMS (Content Management System). Is the source code from the website that we want to make, Many types of CMS that can be used, for this tutorial I use Joomla 1.0.15-stable, which is Full CMS OpernSource (Free). There are many types of CMS opensource (Free) among Mambo, WordPress, Drupal, phpBB, and other.
- Web Browser . Web browser used to view the results of our website and edit contentnya. Web Browser I use is K-Meleon. You can use Mozilla Firefox, Opera, Flock, and other.
- After 1-4 have been prepared now the most important is the Intention and volition.
Step - Step:
-
Install XAMPP 1.5.3a, language and installation options appears. Select language English, and click OK

-
Then there is the setup wizard that will let you know that in XAMPP install, click Next

-
Next is the location of installation, the default is C: \ Program Files, click Install.

-
Wait for installation process and a window will appear that the installation is complete, click Finish.

-
In the next you are asked if you want to install the service Apache, MySQL, and filezilla. Just click Yes.

-
The next step you are asked if you want to install Apache 2 service. Saha click Yes.

-
After that there is notice that Apache 2 has been successfully installed on the port 80 and 443. Click OK.

-
Then the next step you are asked if you want to install the MySQL service, click Yes.

-
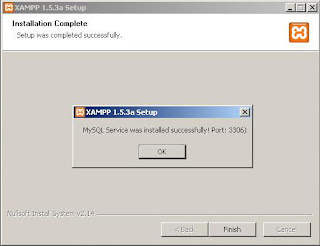
Akan notification window appears that success in the MySQL install on port 3306. Click OK
-
Then you will be asked if you want to install filezilla FTP service, click Yes.

-
Congratulation, XAMPP is done in the install. Click Yes to display the Control Panel it

-
This is from the XAMPP Control Panel.

-
To check whether servicenya have successfully installed, now you open the Web browser and type localhost in the url it. If successful the display will show in the browser page XAMPP


Tuesday, January 15, 2008
Fix the broken Flashdisk

In some cases damage to the flash, there are 2 types of cases the damage that occurred on the flash, the flash was already broken in because it is a component that has been disrupted, but there are also cases of damage to the flash that is located on the damage to its software.
Now, for the second case the damage is located in the flash of the damage to its software this is the case usually occurs in most flash, flash and is usually directly in the waste by its owner.
Actually there are several ways to correct the flash is broken because of the damage by the software which is located on the flash. here is how it:
1. Download HP software utility boot drive through this link
2. install software that has been downloaded.
3. install flash to your computer
4. run applications that are installed in the earlier
5. Select the type of format the disk in use (FAT, FAT32 or NTFS)
6. Select the Quick Format
7. Select Create New or Replace Existing Configuration
In some cases there is also a success that it does not, it depends on the location of the damage, if the software is located on the flash disk is the flash disk can use it again.
But if the damage to the location of its components, the damage can not be this way.
Subscribe

Powered by :

download and click here....!!!


SEO Monitor

