Sunday, June 15, 2008
Learn To Install XAMPP Joomla
![]()
Next is the need to prepare you:
- Computer, can be a PC or Laptop
- XAMPP 1.5.3a. XAMPP is a package that contains the program of Apache, MySQL, filezilla, and Mercury. Here is the required Service Apachenya only.
- CMS (Content Management System). Is the source code from the website that we want to make, Many types of CMS that can be used, for this tutorial I use Joomla 1.0.15-stable, which is Full CMS OpernSource (Free). There are many types of CMS opensource (Free) among Mambo, WordPress, Drupal, phpBB, and other.
- Web Browser . Web browser used to view the results of our website and edit contentnya. Web Browser I use is K-Meleon. You can use Mozilla Firefox, Opera, Flock, and other.
- After 1-4 have been prepared now the most important is the Intention and volition.
Step - Step:
-
Install XAMPP 1.5.3a, language and installation options appears. Select language English, and click OK

-
Then there is the setup wizard that will let you know that in XAMPP install, click Next

-
Next is the location of installation, the default is C: \ Program Files, click Install.

-
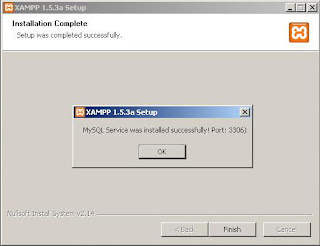
Wait for installation process and a window will appear that the installation is complete, click Finish.

-
In the next you are asked if you want to install the service Apache, MySQL, and filezilla. Just click Yes.

-
The next step you are asked if you want to install Apache 2 service. Saha click Yes.

-
After that there is notice that Apache 2 has been successfully installed on the port 80 and 443. Click OK.

-
Then the next step you are asked if you want to install the MySQL service, click Yes.

-
Akan notification window appears that success in the MySQL install on port 3306. Click OK
-
Then you will be asked if you want to install filezilla FTP service, click Yes.

-
Congratulation, XAMPP is done in the install. Click Yes to display the Control Panel it

-
This is from the XAMPP Control Panel.

-
To check whether servicenya have successfully installed, now you open the Web browser and type localhost in the url it. If successful the display will show in the browser page XAMPP


Subscribe
Powered by :
download and click here....!!!


0 comments:
Post a Comment